


Connect to Office365 IMAP using OAuth 2.0 |
||
|
| ||
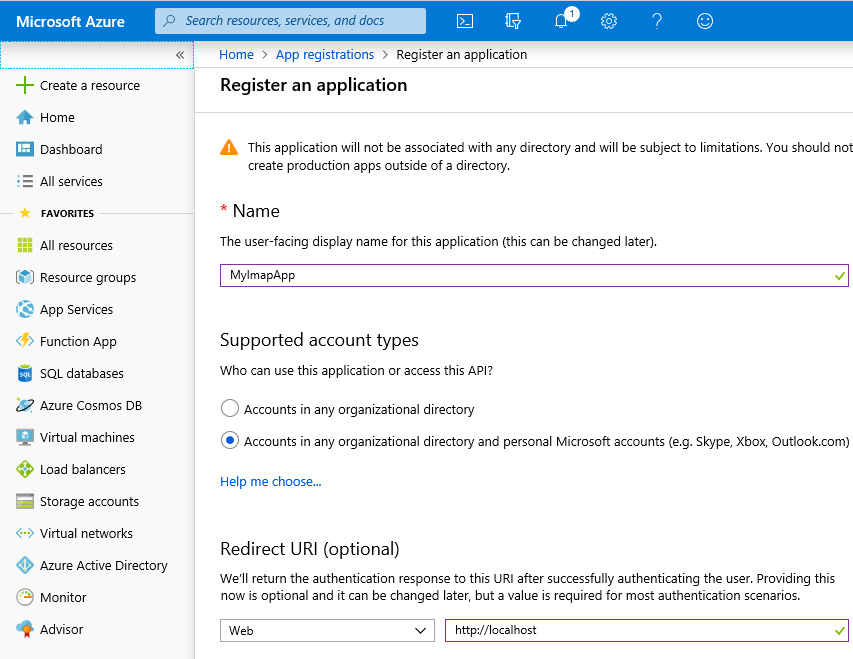
Registering a new applicationIf you want to use the OAUTH 2.0 authorization protocol, you need to register a new application using the Azure portal. The following document describes this process in details: Register an application with the Microsoft identity platform When clicking "Azure Active Directory / App Registrations / New Registration", the "Register an application" page will appear. You need to enter your application's registration information: Name, Supported account types, and Redirect URI. Note that you need to specify the "Web" app type, and provide a local URI: "http://localhost". It is necessary for the TclOAUTH component for receiving authorization tokens.
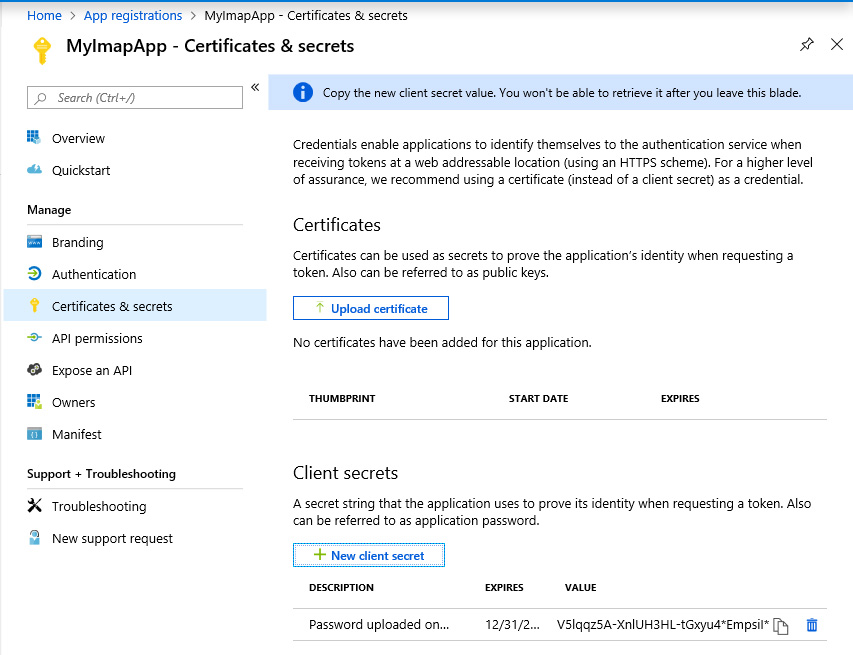
The Microsoft OAUTH engine supports different authorization flows, including Authorization Code and Implicit Grant. In this program, we use the "Authorization Code grant flow" which requires the TclOAUTH component to open a web browser with the standard Microsoft Live login form. After logging in and confirming the access permissions for the given application, the browser will be redirected to the specified local URI. This allows TclOAUTH to automatically extract authorization tokens. You can learn more about the OAUTH 2.0 protocol and Microsoft-specific protocol implementation using the links below: Connect to Outlook.com IMAP using OAuth 2.0 After registering a new application, you need to add a new Client Secret for your registered application. You can do that using the "Certificates & secrets" menu within the "Azure Active Directory / App Registrations settings". You need to save the Client Secret value. This value will be used when setting up the TclOAUTH properties.
Connecting to Office365 IMAP using OAuth 2.0
For connecting to Microsoft Outlook / Office365 IMAP service, you need to use the TclIMAP4 component. A necessary authorization token can be obtained using the TclOAUTH component. Let’s consider both these components:
Microsoft recommends to use the "wl.offline_access" scope together with "wl.imap". Otherwise, an app can access the user's info only when a user signs in to Live Connect and uses your app. When you call the TclOAUTH.GetAuthorization method, the TclOAUTH component initiates the OAUTH 2.0 authorization process, and a default web browser navigates to the Microsoft login page. If authorization successful, GetAuthorization returns an authorization token, and browser displays the "OAuth Authorization Successful" response. In case of authorization failure, browser shows "OAuth Authorization Failed". Note, if authorization fails, the control is not returned from the GetAuthorization method until you close the TclOAUTH component by calling the Close method.
The try-except blocks are necessary for handling some socket errors, such as connection timed out. The introduced program is mostly simple demos, and by no means, a completed application. Depending on your application architecture, you may implement another algorithm to handle connection errors.
Retrieving IMAP mailbox infoAfter successful connecting to Office365 IMAP and obtaining a list of IMAP mailbox folders, you need to select a mailbox and obtain information about messages within this mailbox. The TclIMAP4.GetMailBoxes(List) method returns a list of IMAP mailbox folders. To start working with mailbox messages, you need to select a mailbox using the TclIMAP4.SelectMailBox(Name) method. This method collects all important mailbox information, such as a total number of messages, recent messages, first unseen message number, etc., and saves it to the TclIMAP4.CurrentMailBox property. You can use this information for managing messages within the selected mailbox: downloading selected messages, retrieving message headers, deleting, etc. The method TclIMAP4.RetrieveHeader(MessageNo) returns information about the message, such as subject, sender, recipients. It doesn't return a message body: text, images, or attachments. This feature can save time on filling a message list in your app. However, if a mailbox contains a big number of messages, this approach takes a lot of time. You have to retrieve header information per each message and send multiple IMAP commands over the Network. Another way is to send one single request and get information about all messages simultaneously. A custom FETCH command with the ENVELOPE parameter does all the work. The TclIMAP4 component provides a special method for sending custom commands: TclIMAP4.SendTaggedCommand.
Here, the "1:*" argument denotes fetching all messages within the currently selected mailbox. This works far faster than fetching each message step-by-step. If you want to perform further optimization, you can implement so-called paging functionality and fetch only the currently displayed messages. The ENVELOPE parameter makes an IMAP server to return structured information about each message within the selected mailbox. This message structure is described in the RFC 3501 standard. Next, you need to loop through the IMAP server response lines and extract envelope information for each message. See the TMainForm.FillMessages method of the program. Each envelope is prefixed with a corresponding message number within the IMAP response. The algorithm uses this information for splitting envelopes. The introduced program implements a simple ENVELOPE parser that extracts all necessary message information: subject, sender, recipients, date, etc., and saves to separate properties:
Retrieving Email messagesqweIf you want to download a message from IMAP mailbox, you need to use the TclIMAP4.RetrieveMessage method. The TclMailMessage component (see Clever Internet Suite) can extract MIME parts from the downloaded message: text, embedded images, and file attachments. All you need is to substitute an instance of the TclMailMessage component when calling the TclIMAP4.RetrieveMessage method:
Note, if a message has attachments, you need to provide the TclMailMessage component with stream instances to which attachments will be saved to. The TclMailMessage component does not keep the attachment content in memory. It uses external Delphi streams instead. You need to handle the OnSaveAttachment event in order to provide the component with such stream objects. Usually, an event handler may look like the following:
Note, some attachments do not have a file name. You may need to generate new names in order to save such attachments to the disk. See also Clever Internet Suite Tutorials: Saving Mail Attachments Finally, the downloaded message details can be displayed:
DownloadsClever Internet Suite Download
License InformationThe DataDepersonalizer application is distributed under the GNU LESSER GENERAL PUBLIC LICENSE Version 3.
Sergey Shirokov
|